

What are the benefits of origami for preschoolers?
Simple origami for preschoolers is a creative activity that combines fun and education. The benefits or art and craft is really endless with kids. Through the art of paper folding and manipulating paper into various forms, you can help your little one develop essential skills like concentration, dexterity, creativity, and a sense of achievement.
Fine motor skills
Folding paper requires precise movements, which helps develop hand strength and coordination in young children. As they practice different folds and techniques, they improve dexterity and control, laying a strong foundation for future skills such as writing and drawing.
Focus and patience
Following the steps of an origami project can teach your little one focus and patience. As they navigate through each stage of folding, they learn to concentrate on the task at hand, building resilience and the ability to see a project through to completion. This skill is invaluable in many aspects of their learning and daily life.
Creativity and imagination
Origami for beginners helps unleash your child’s creativity and imagination. The possibilities are endless as they transform simple sheets of paper into animals, boats, or shapes. This creativity not only works on their artistic skills but also encourages problem-solving and innovative thinking, making easy origami genuinely rewarding for you and your little one.
Simple origami shapes for preschoolers
Easy origami for kindergarten aged kids should be fun—not perfect! It’s a great way to bond with your children while engaging in a creative activity. As you fold paper together, you can teach them patience, problem-solving skills, and even some basic math concepts like shapes and symmetry. Try these easy origami ideas and remember that the process is more important than the final product.
Basic origami dog face
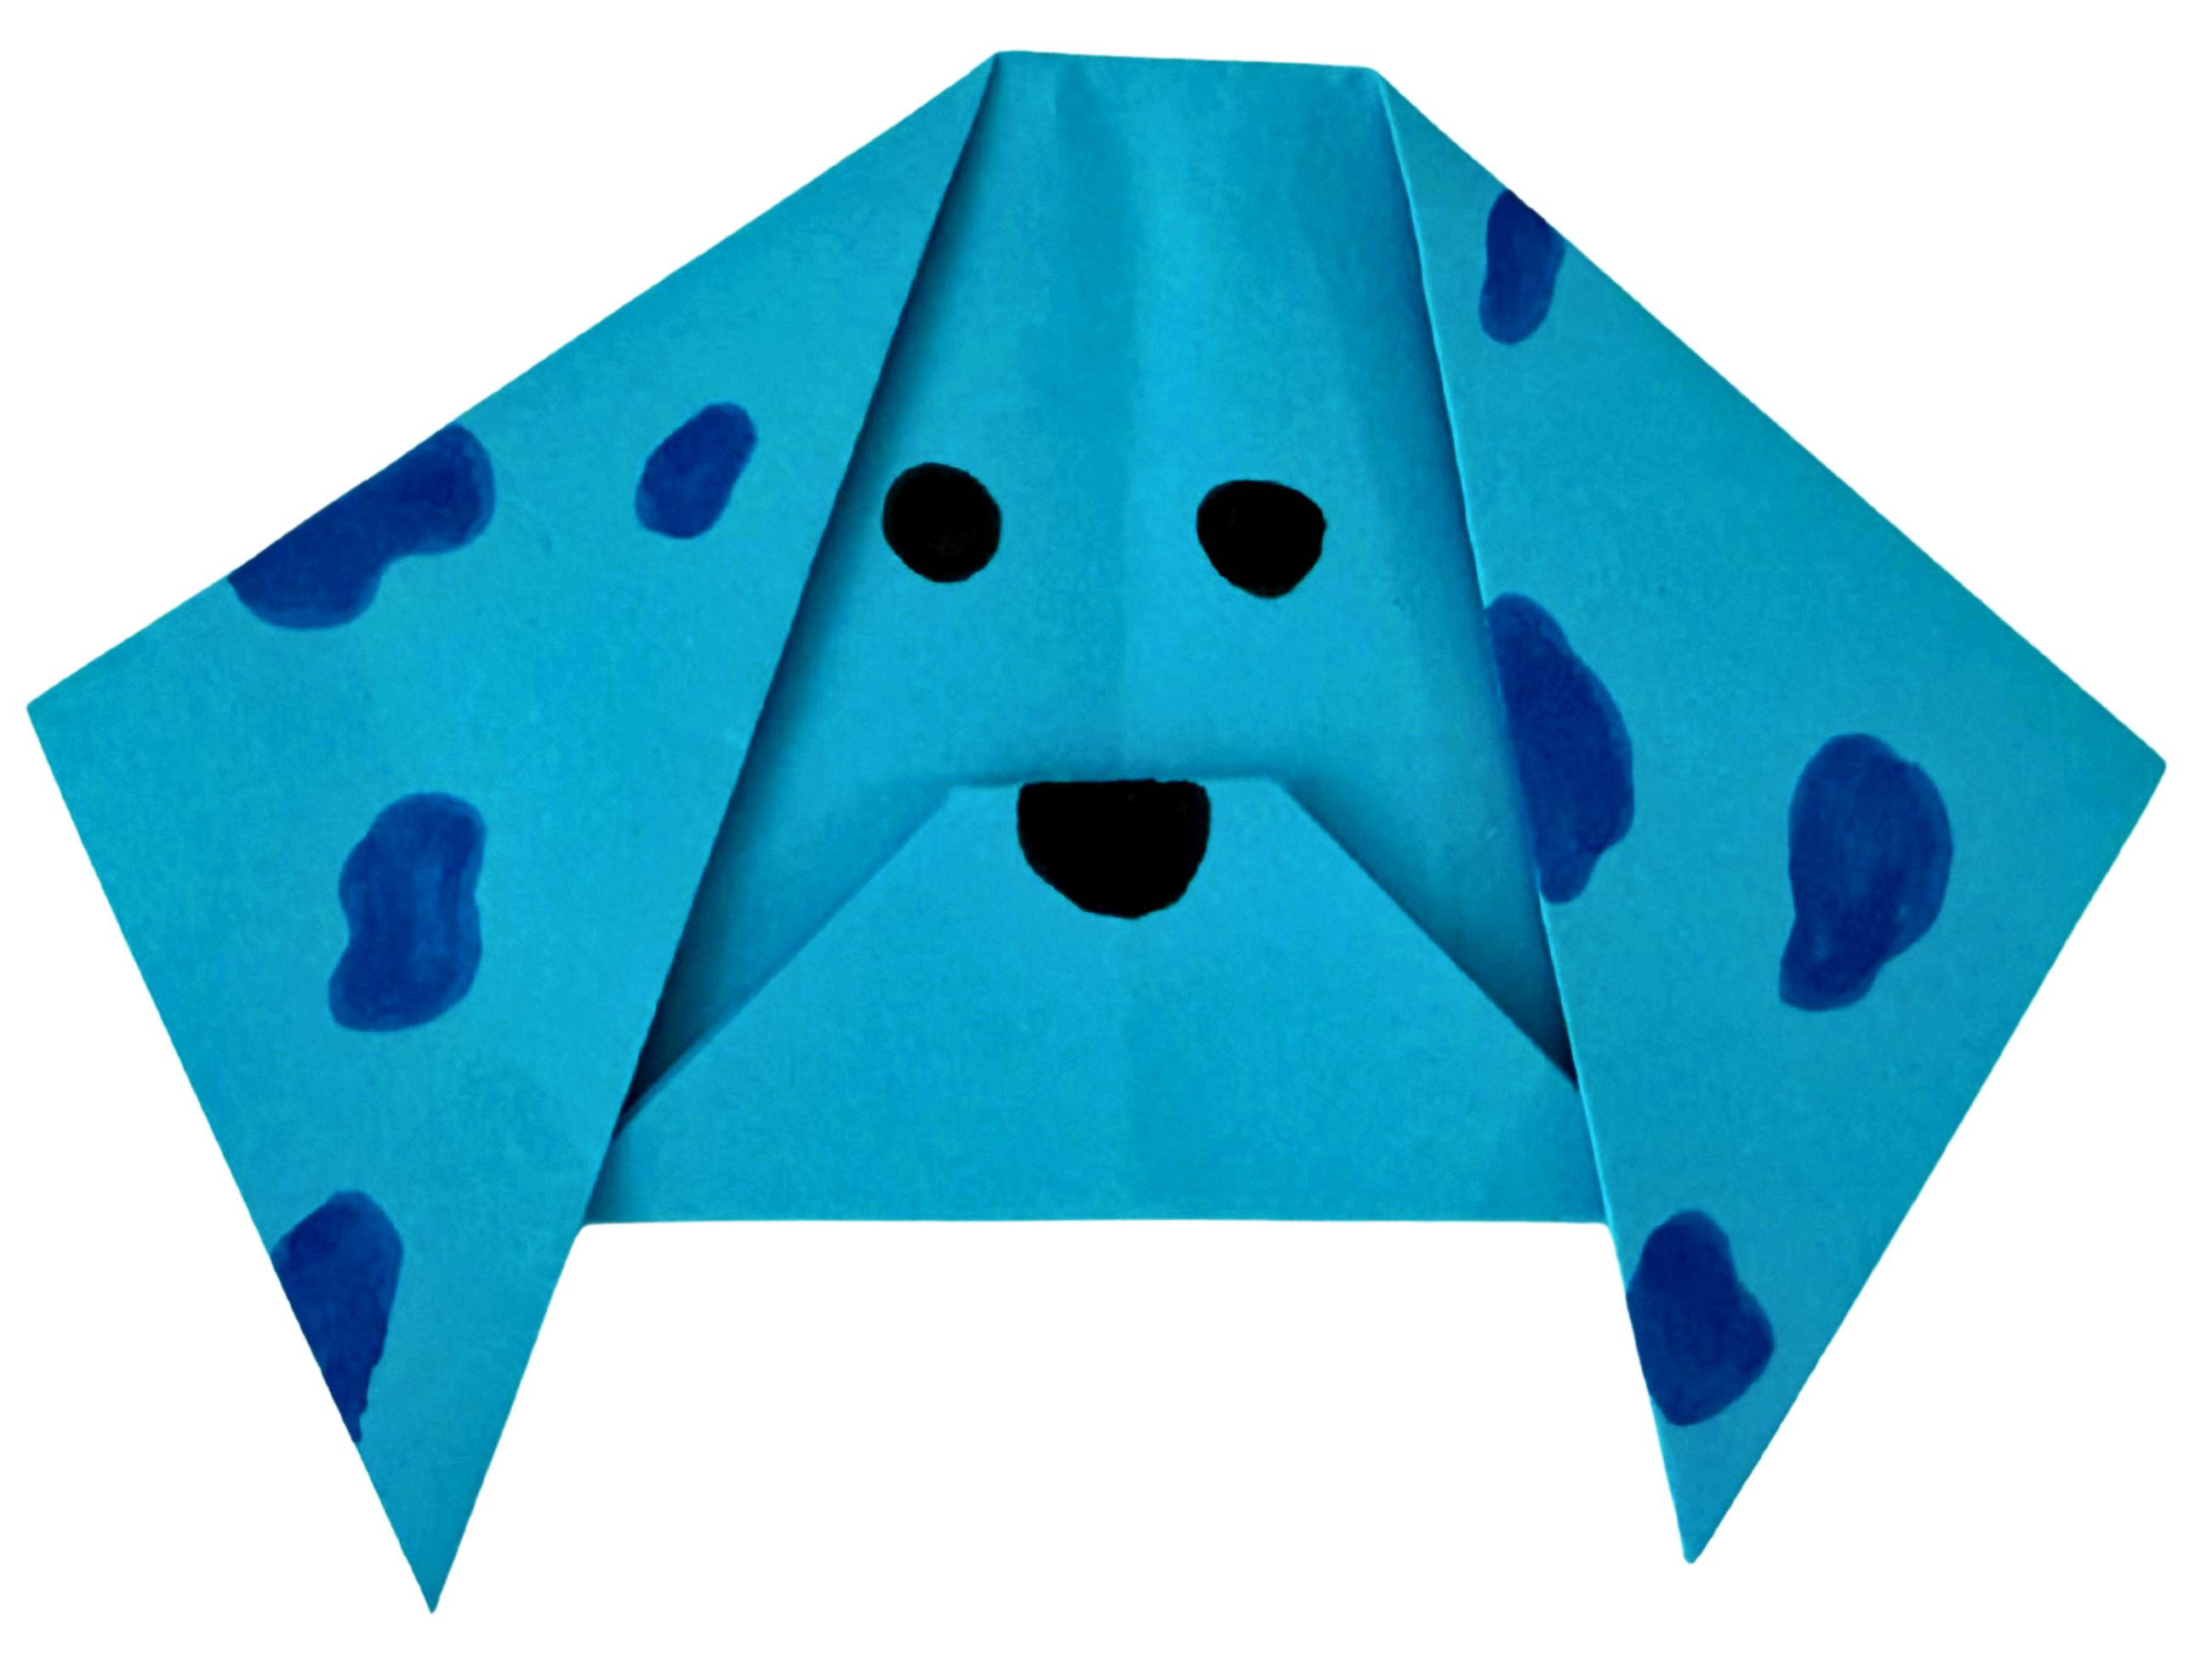
- Start with a square piece of paper
Place it so it looks like a diamond (corner at the top).
- Get folding
Fold the top corner down to the bottom.
Fold the right corner over to the left, then unfold that last fold to leave a crease. This will be the centre of your dog’s face.
- Make the ears
Fold the top left and right corners down to form floppy ears.
Leave a small gap at the top middle so it looks like a forehead.
- Make the nose
Fold the bottom corner up and tuck under the top point to make your dog’s snout.
- Decorate
Draw eyes, a nose, and any other features you like!
Tip: Use spotty origami paper to create a dalmatian!
Easy origami cat face
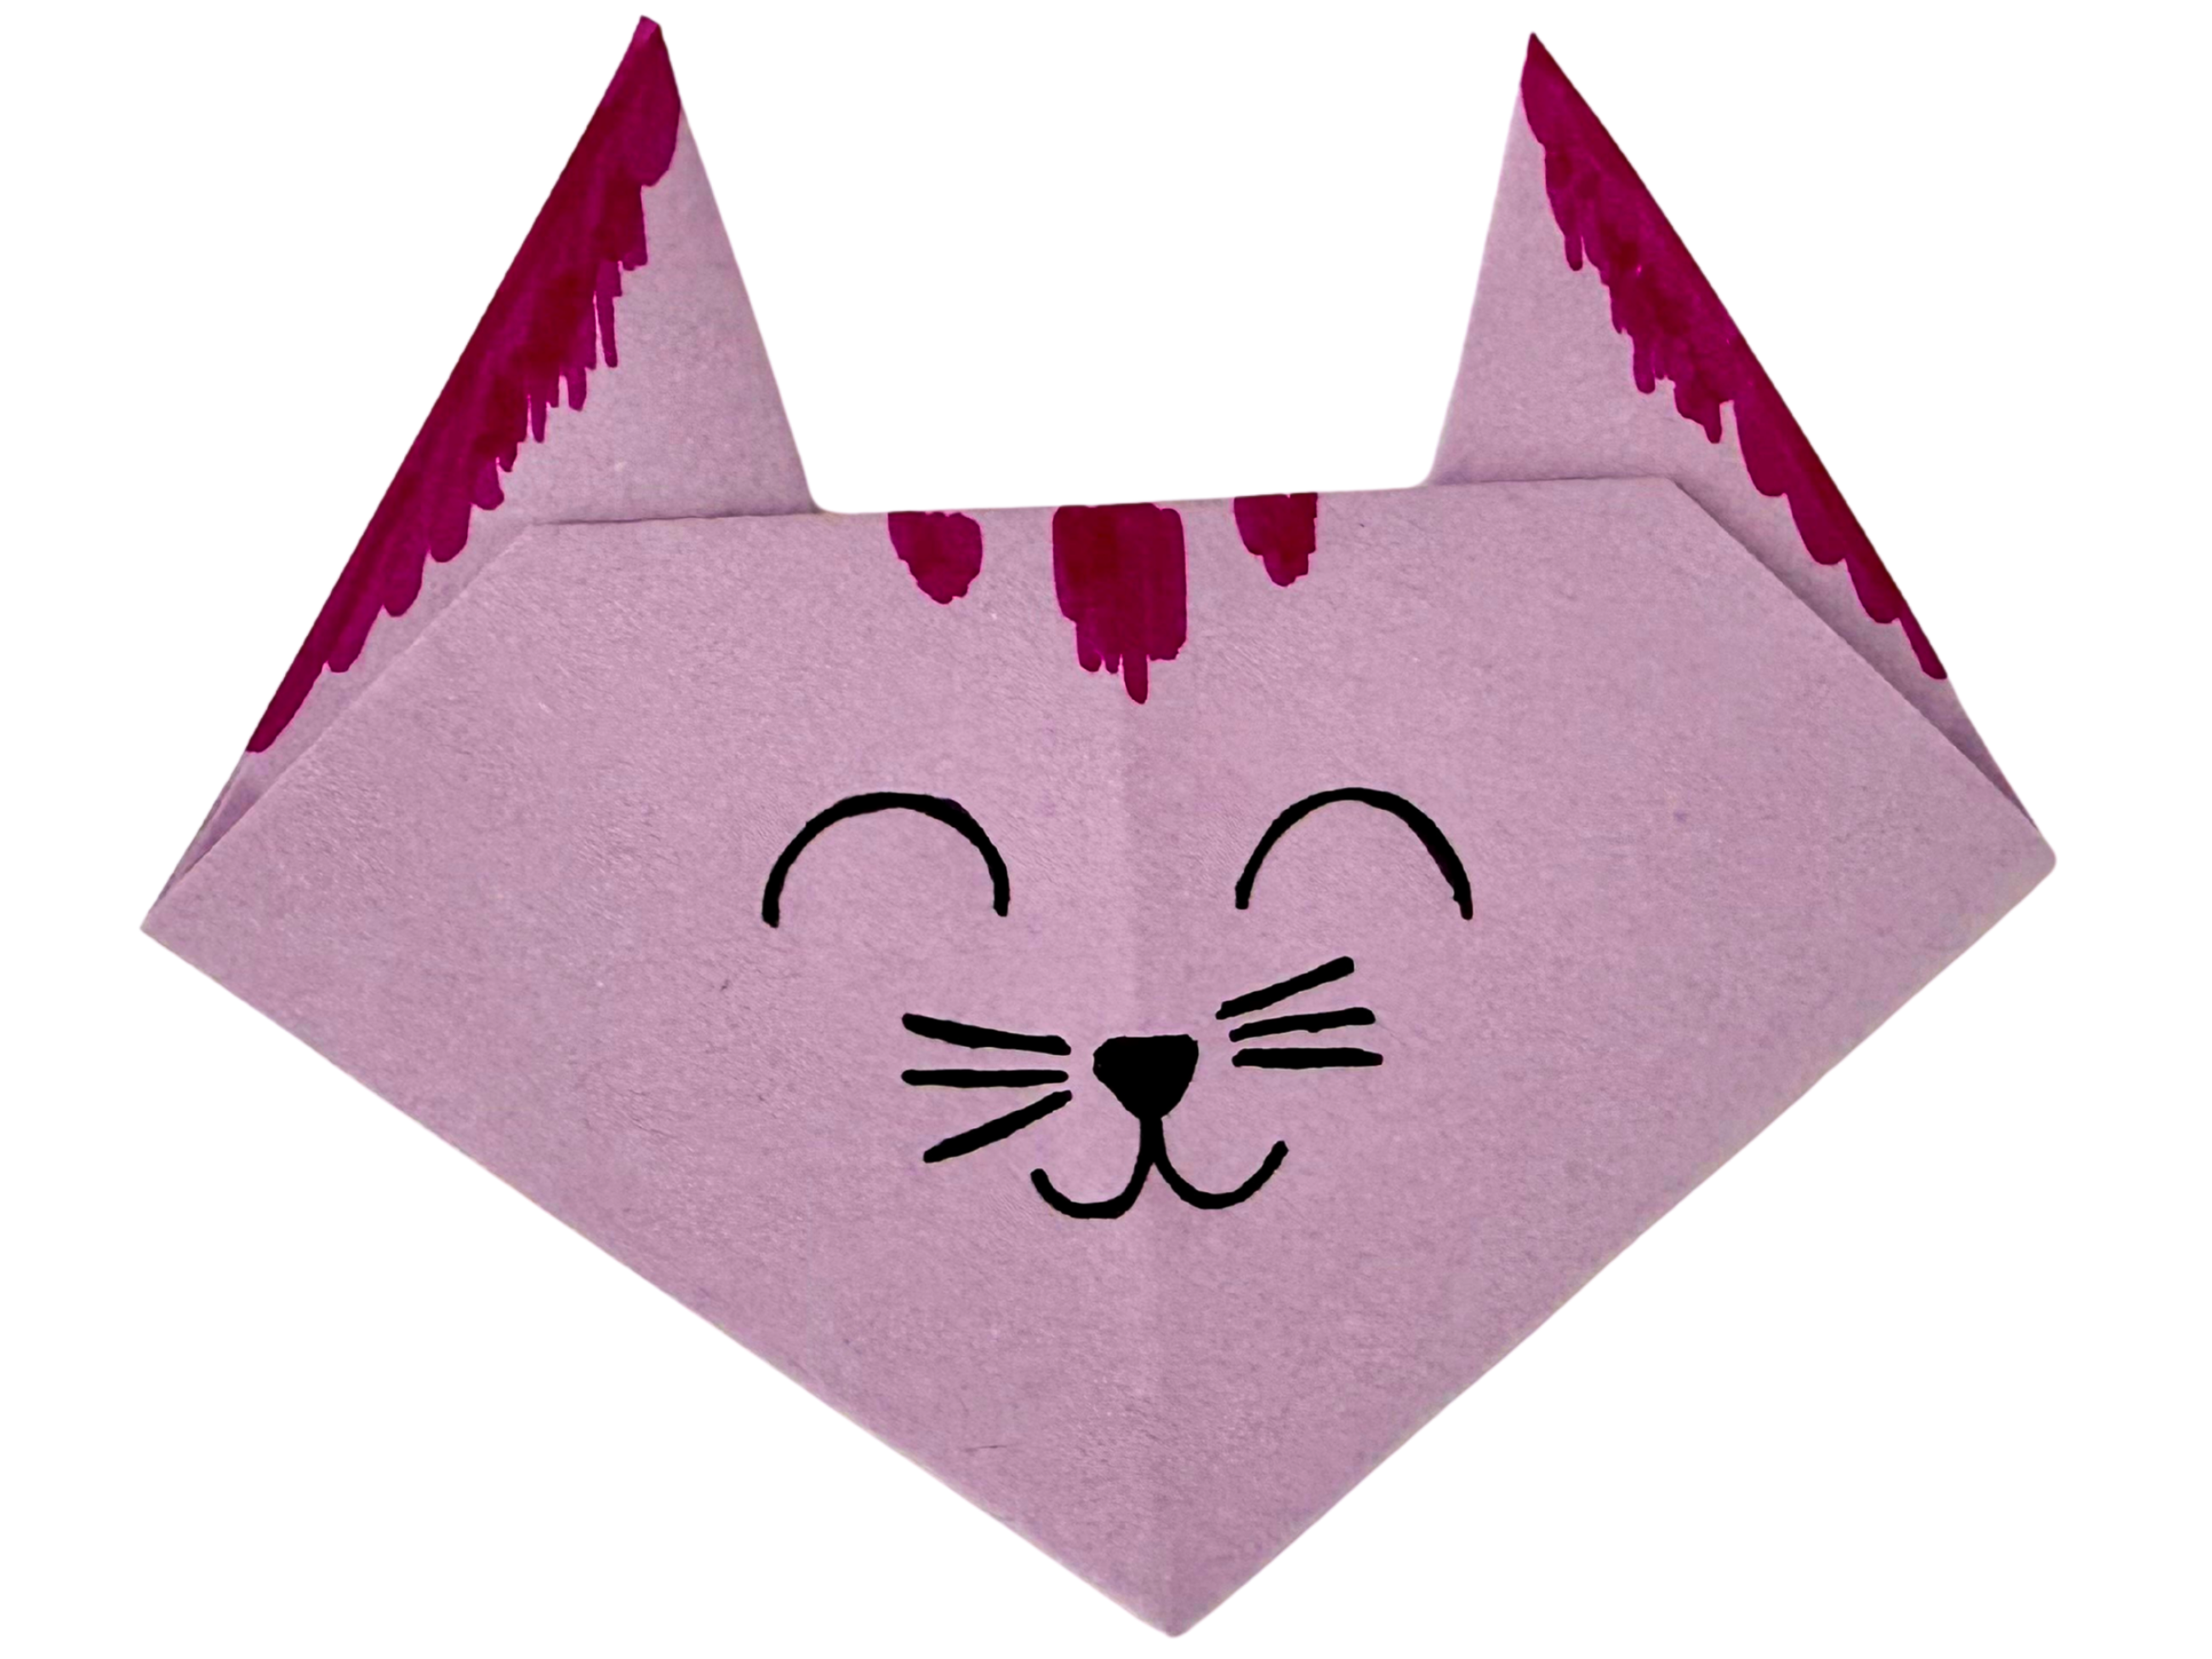
- Start with a square piece of paper
Place it so it looks like a diamond (corner at the top).
- Get folding
Fold the bottom corner up to the top corner to make a triangle.
Fold the left corner over to the right corner to make a smaller triangle, then unfold this fold to leave a crease.
- Make the ears
Fold the right and left corners of the triangle upwards at an angle from the middle crease, to form the cat’s ears. Turn the whole piece over so the ears are now at the back.
- Shape the face
Fold a small portion (roughly 2cm) of the top corner down toward the back to round the top of the head.
- Decorate
Draw eyes, whiskers, and a nose to complete your cat’s face!
Tip: You can use markers to draw whiskers or add googly eyes for added fun!
Basic origami fish (+ butterfly!)

- Start with a square piece of paper
- Get folding
Fold the paper in half (top to bottom), then unfold. Next, fold the paper in half the other way (side to side), then unfold.
Flip your paper over and rotate the paper through one quarter turn (90 degrees).
Next, fold the paper diagonally (corner to corner), then unfold. Repeat on the other diagonal, then unfold.
- Collapse into a triangle base (also called a “Waterbomb Base”)
Pinch the sides: Hold the left and right edges of the paper and gently push them toward each other. As you push the sides in, the paper will naturally want to collapse into a triangle shape. Help it along by guiding the top and bottom corners to meet at the centre.
Flatten the triangle: Once the folds are aligned, press everything down flat. You should now have a triangle with two flaps on each side.
- Shape the tail
With the point of the triangle at the bottom, hold the edge of the point with one finger, while holding the top right corner (front part only) with the other. Fold it up towards the left corner (about 1/3 the way across the left), forming the first part of the tail.
Then, take the top left corner and fold it upwards towards the right, and over the top of the first fin. Now you’ve completed the tail!
Flip it over to reveal your fish.
Tip: before you flip it over, you’ve also made a cute butterfly. Use bright colours or gems to make your fish and butterfly stand out!
Easy origami paper fan

- Start with a rectangular piece of paper
Lay the paper flat with the longer side facing you.
- Make the first fold
Fold the bottom edge up about 2 cm (or 1 inch). Press firmly to crease.
- Accordion fold
Flip the paper over and fold the same amount again.
Continue flipping and folding until you reach the top of the paper.
This creates a zigzag or accordion pattern.
- Pinch the base
Once all folds are done, pinch one end of the folded paper tightly (shorter side) to form the base of the fan.
- Spread the top
Gently pull apart the folds at the opposite end to fan them out.
- Secure the base (optional)
Use tape, string, or a paperclip to hold the pinched end together.
Tip: Use colourful paper to make your fan more attractive!
Easy origami heart

- Start with a square piece of paper
Place it so it looks like a diamond (corner at the top).
- Get folding
Fold the top corner down to the bottom, then unfold.
Fold the right corner over to the left, then unfold.
- Create base folds
Fold the top corner to the centre of the paper.
Fold the bottom corner up to the top edge.
- Shape the heart
Fold the bottom right edge to the centre crease.
Repeat on the bottom left edge.
- Round it out
Flip the paper over. Fold the top corners down to round the top of the heart.
Fold the side corners back to smooth the edges.
- Done!
Flip it over once more to reveal your cute origami heart.
Each of these easy origami ideas is designed to be easy origami for kindergarten aged kids, allowing preschoolers to explore their creativity while developing essential skills.
Materials needed for easy origami
Origami is a low-cost activity that requires minimal setup, making it an ideal choice for families looking for a fun and creative project. With just a few simple materials, you can dive into the world of paper folding, which not only promotes creativity but also works on your little ones fine motor skills.
To get started with your origami projects, really all you need is some paper. Here are some paper options:
- Pre-cut origami paper: This paper is specifically designed for origami, often featuring vibrant colours and patterns. It comes in various sizes, typically square, making it perfect for folding.
- Coloured paper: Any paper in different colours can be used. Simply cut or tear it into squares, and you’re ready to fold!
- Any square paper: If you have plain or patterned paper lying around the house, feel free to use it! Just ensure it is cut into a square shape.
There’s no need to rush out and buy fancy supplies. Store-bought origami paper is not a requirement; plain paper and a sense of curiosity are more than enough to embark on your origami journey.
Tips for making easy origami with kindergarteners at home
Parents don’t need to be origami experts to enjoy the fun of folding with their preschoolers. Simple origami for preschoolers is about learning together, encouraging creativity and bonding. Here are some helpful tips to help you enjoy the journey together:
- Start with very simple shapes: Begin with basic origami designs that are easy to fold. Repeating these shapes a few times will help build confidence and reinforce learning.
- Demonstrate each step slowly: Take your time to show each step clearly, folding alongside your child. This not only helps them understand the process but also makes it a shared activity.
- Praise the effort, not the result: Focusing on your child's effort rather than the final product encourages a growth mindset and makes the experience more enjoyable. This positive parenting philosophy nurtures your child's self-esteem and emotional well-being.
- Use bright paper or encourage decoration: Using colourful paper or allowing them to decorate the paper after folding adds interest and a personal touch that will keep them engaged and involved.
Create a positive and supportive environment: Set up a dedicated space or art corner where you can comfortably work on origami together. A clear open workspace allows room for creativity and makes the activity more enjoyable.
Folding fun into your preschooler’s day
Origami, much like drawing, provides a screen-free activity that allows preschoolers to engage their creativity and express themselves. It helps them grow, learn, and develop fine motor skills while having fun. As they fold paper into various shapes, they not only explore their artistic side but also build confidence in their abilities.
Enjoy the process together, celebrate the wonky folds and quirky creations that emerge, as these moments are just as valuable as the final product. Watch your child’s confidence grow as they experiment with different designs and techniques. For more creative ideas, check out our article on Easy and Fun Drawing Ideas for Preschoolers.
Frequently asked questions about easy origami for preschoolers
How to make the easiest origami?
Start with simple shapes like a paper boat or a butterfly. Use a square piece of paper, follow step-by-step instructions, and fold slowly. Practice the same design multiple times to build confidence, and enjoy the process of creating together with your child.
Can 4 year olds do origami?
Yes, 4-year-olds can enjoy origami! Start with very simple designs and assist them with folding. It’s a great way to enhance their fine motor skills and creativity.
What are the 5 basic origami folds?
Not all origami folds have specific names, but many commonly used folds do. Some of the most recognised folds, such as valley folds, mountain folds, reverse folds, squash folds and petal folds are essential building blocks in origami. However, there are countless variations and techniques, and not every fold will have a designated name. It’s more important to understand the folding principles than to memorise every term.
What is the best paper for origami for beginners?
For beginners, lightweight origami paper is ideal, as it is easy to fold. Alternatively, any square paper, such as coloured or patterned paper, can also work well.
What are the art skills of a 4 year old?
At age 4, children typically exhibit skills such as scribbling, basic shapes, colour recognition, and the ability to use tools like crayons or paper scissors. They also enjoy experimenting with different materials and expressing their creativity.
Related articles

How Art and Craft Activities for Preschoolers Can Benefit Your Child
Are you on the lookout for engaging and imaginative art and craft activities for preschoolers? Look no further!
11 mins to read

Easy and Fun Drawing Ideas for Preschoolers
Discover the benefits of drawing for preschoolers!
9 mins to read

Teaching Emotional Regulation Skills to Preschoolers
Emotional regulation in preschoolers is an important part of every child’s development.
8 mins to read